Knowing how to remove a bearing without damaging the shaft or housing is one of the most valuable maintenance skills in any plant — yet it is also one of the most commonly botched. A bearing that has failed, seized, or reached the end of its service life still has to come off, and the way it comes off decides whether the shaft journal and housing bore survive for the replacement. Pull on the wrong ring and you can wreck a healthy bearing in seconds; hammer carelessly and you score a €300 shaft journal to save a €10 bearing. This guide explains how to remove a bearing safely using mechanical pullers, controlled heat, hydraulic methods, and field-proven no-puller techniques — and, just as importantly, how to avoid the mistakes that turn a routine job into a machine repair. Get it right and the same shaft runs for years with the new bearing; get it wrong and you are re-machining a journal. That is why how to remove a bearing correctly is a skill worth mastering.
What Safe Bearing Removal Means
Safe removal is governed by one golden rule that mirrors the mounting rule in our bearing mounting techniques guide: apply the removal force to the ring that carries the interference fit, never through the rolling elements. When a bearing sits on a shaft with a k6 or m6 fit, the inner ring is locked to the shaft while the outer ring floats in the housing. Pulling on the outer ring forces the balls to transmit the entire pull load, and the balls press into the raceways at their contact points — creating permanent brinell marks. The bearing may still rotate, but it will run noisy, vibrate, and fail early.
The second principle is that removal force must be axial and even. A puller that grips only one side of the ring cocks the bearing at an angle, and a cocked bearing gouges the shaft journal as it comes off. Every method in this guide is designed to keep the bearing square to the shaft or housing while the fit releases.
The third principle is patience. In practice, how to remove a bearing safely is more a matter of timing and method than of muscle. How to remove a bearing from an interference fit is rarely a brute-force problem — it is a problem of physics: expand the ring, lubricate the interface, or apply steady axial force. If the first attempt does not move the bearing, stop and change method rather than increasing the hammer.
Preparation: Which Ring Is Tight?
Before touching a tool, establish which ring has the interference fit — this single decision determines how to remove a bearing without collateral damage. In the most common arrangement — a rotating shaft carrying a radial load — the inner ring is interference-fitted (k6/m6) and the outer ring is a push fit in the housing. In wheel-hub and pulley arrangements the opposite is true: the outer ring is the tight one. The rule engineers use: whoever carries the rotating load gets the interference fit, explained in full in our bearing shaft fit tolerance guide. Getting this identification wrong is the root cause of most removal damage, because it determines which ring the puller jaws must grip.
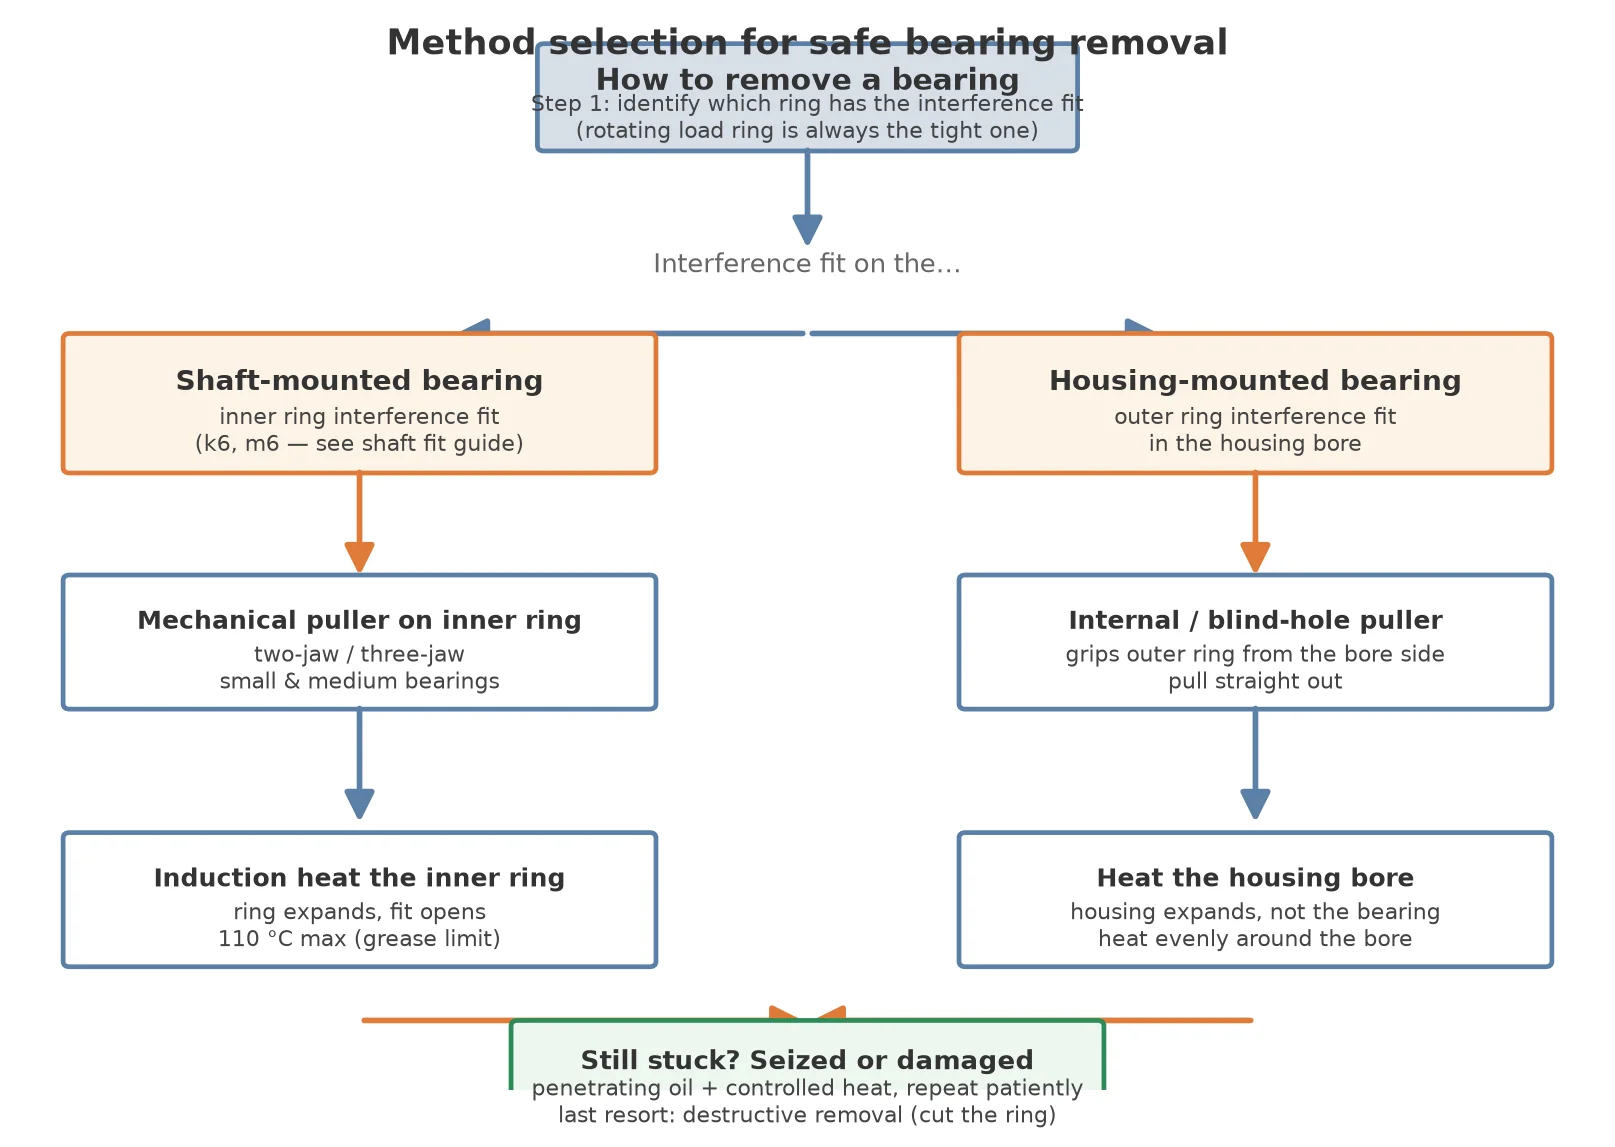
The flow chart above summarises the decision path. Once the tight ring is known, the method follows: inner ring tight means pulling from the shaft side or heating the inner ring; outer ring tight means an internal puller from the bore side or heating the housing — never the bearing itself, since heating the outer ring makes it expand and grip harder.
Inspect Before You Remove
Part of deciding how to remove a bearing is knowing whether it will be reused. Clean the area, remove any locking devices or set screws, and photograph the assembly if it is part of a warranty claim. Check whether the bearing is to be reused — a bearing being removed for inspection can be saved by careful removal, while a failed bearing is scrap and may justify more aggressive (even destructive) methods. Inspect the shaft shoulder and housing bore for burrs or nicks that could score the surfaces during extraction, and de-burr them with a fine stone before pulling.
Tooling and Safety
Minimum kit: a two-jaw or three-jaw puller sized to the bearing, an internal (blind-hole) puller, a bearing heater or heat gun with a temperature indicator, penetrating oil, soft-faced mallet, and brass or copper drifts. Never strike a bearing with a steel hammer. Wear safety glasses and heavy gloves — snap-through of a seized fit releases stored energy suddenly, and hot rings cause burns.
Method 1: Mechanical Pullers — The Standard Approach
The mechanical puller is the workhorse of bearing removal. For most mechanics, the puller is the default answer to how to remove a bearing from a shaft. The critical detail is jaw placement: the jaws must hook the inner ring face for a shaft-mounted bearing. If the bearing is flush against a shoulder and the jaws cannot reach the inner ring, use a puller with a spreader, or remove the bearing with the shaft supported in a press (see Method 4).
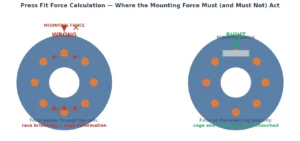
The difference between correct and incorrect pulling is simple: on one side, the puller grips the inner ring and the force path runs straight from the ring to the shaft fit; on the other, the jaws hook the outer ring and every pound of pull is transmitted through the balls, indenting the raceways at each ball position. This single distinction is why experienced technicians inspect a puller’s jaw reach before applying force.
Two-Jaw vs. Three-Jaw
Choosing between them is a common part of learning how to remove a bearing properly. Two-jaw pullers offer better access in tight spaces; three-jaw pullers distribute the load more evenly around the ring and are less likely to cock the bearing. For large bearings, a hydraulic puller with a pump delivers smooth, controllable force — jerking the screw of a manual puller can shock-load the fit and cause the jaws to slip and score the shaft.
Internal and Blind-Hole Pullers
When the outer ring is tight in a housing — or the bearing sits in a blind hole — an internal puller (collet-type or expanding-jaw) grips the outer ring bore from inside and pulls the bearing out of the housing. These are the correct answer to the common question of how to remove a bearing from a closed housing where no access exists from behind. Slide hammers with internal collets are the standard field tool for this job; the expanding jaws must seat fully on the ring bore before any force is applied.
Method 2: Heat-Based Removal
Heat is the fastest way to open an interference fit, because it works with the physics of the fit rather than against it. For a shaft-mounted bearing, heating the inner ring makes it expand faster than the shaft, opening a radial gap at the interface while the shaft stays cool. The bearing can then be pulled with modest force — or in many cases slides off by hand.
Induction Heaters
An induction heater is the professional tool for this job, and it is how most motor shops answer how to remove a bearing in the least time: it heats the inner ring in seconds while leaving the shaft, outer ring, and rolling elements relatively cool, which maximises the temperature difference and protects the grease and seals. Never exceed 110 °C (230 °F) for a grease-packed, shielded or sealed bearing — above that the grease degrades and the seal or shield retaining compound softens. This is the same temperature limit we recommend for heat mounting in the bearing mounting techniques guide, and it applies in reverse for removal.
Heating the Housing, Not the Bearing
For a housing-mounted bearing with an outer ring interference fit, the target of the heat is the housing, not the bearing. Warming the housing bore — evenly, with a heat gun or by warming the housing in an oven for small components — expands the bore and releases the outer ring. Heating the bearing itself here is counterproductive: the outer ring would expand and grip harder. This distinction is a frequent source of confusion and is worth stating plainly, because it inverts the shaft-side procedure completely.
Never Use an Oxy-Acetylene Torch on a Bearing
A welding torch applied directly to a bearing ring overheats the steel locally, distorts the ring, burns the grease, and can draw the temper from the raceway — even if the bearing survives, its metallurgy is compromised. Torch heating is only acceptable in extreme field conditions on a bearing that is already scrap, and even then the flame should be moved continuously to avoid localised hot spots. For a bearing you intend to reuse, induction heating is the only heat method that is genuinely safe.
Method 3: Hydraulic and Oil Injection Methods
For large cylindrical and spherical roller bearings, mechanical pullers quickly reach their practical limit — the fits are heavier and the rings are massive. This is where hydraulic methods take over. SKF’s official dismounting guidelines describe these procedures in detail.
Oil Injection
Oil injection forces high-pressure oil (typically 500–1,000 bar) through a small hole in the shaft or housing into the fit interface. The oil film separates the ring from the shaft, and the bearing can then be drawn off with very low axial force. For large paper-machine and mill rolls, oil injection is how to remove a bearing without scoring either surface. It is also the gentlest method of all — the fit surfaces never touch during removal — but it requires the shaft or housing to have the necessary oil holes and grooves, which are usually machined at design time for large bearing arrangements.
Hydraulic Nuts and Pullers
A hydraulic nut is a ring-shaped device that threads onto the shaft beside the bearing and pushes the inner ring off with controlled hydraulic pressure. Hydraulic puller kits combine the puller frame with a hydraulic cylinder and pump, delivering the same even, controllable force that a screw puller would provide but with far more capacity. These tools are standard in mills, gearbox shops, and paper machines where bearings above 100 mm bore are removed regularly.
If you are unsure how to remove a bearing of this size safely, the engineering answer is to rent or borrow the correct hydraulic tooling rather than improvise — the cost of a scored shaft on a large machine dwarfs the tooling cost by orders of magnitude.
How to Remove a Bearing Without a Puller
Field conditions frequently demand how to remove a bearing with no puller in sight — a repair van, a small workshop, or a plant that never bought the tooling. Three no-puller techniques are proven and safe when done carefully.
Drift and Hammer (Brass or Copper Only)
Place a brass or copper drift — never steel — against the inner ring face and tap alternately at 180° positions around the circumference. Alternating taps keep the bearing square as it moves; a single-sided tap cocks it and gouges the shaft. Work the bearing off a little at a time, rotating the drift position after every few taps. This is the classic method for small deep groove ball bearings and is effective on fits up to roughly j6/k6 light interference.
Support the Shaft and Press the Bearing Off
When the bearing sits at the end of a shaft, support the inner ring on the two support plates of an arbor press (or two blocks of equal height) and press the shaft through the bearing. The shaft moves, the bearing stays — and the force path runs from the inner ring directly into the supports, never through the balls. Supporting the inner ring and pressing the shaft through is how to remove a bearing when a puller cannot reach behind the ring, and it is the cleanest no-puller method when a press is available.
Penetrating Oil for Seized and Stuck Bearings
A bearing that has seized on its shaft — corrosion-fused or galled — needs the interface loosened before any removal force is applied. Penetrating oil is frequently the decisive step in how to remove a bearing that has seized. Apply penetrating oil around the inner ring and shaft interface, allow it to soak, then combine with controlled heat (warming the inner ring to 90–110 °C) and gentle axial tapping. Repeat the oil–heat–tap cycle patiently; seized bearings release in stages, not all at once. If the bearing is damaged beyond reuse and still refuses to move, the last resort is destructive removal — cutting the inner ring with an angle grinder in two places so it relaxes and can be peeled off, taking care to stop before the cut reaches the shaft surface.
Common Bearing Removal Mistakes to Avoid
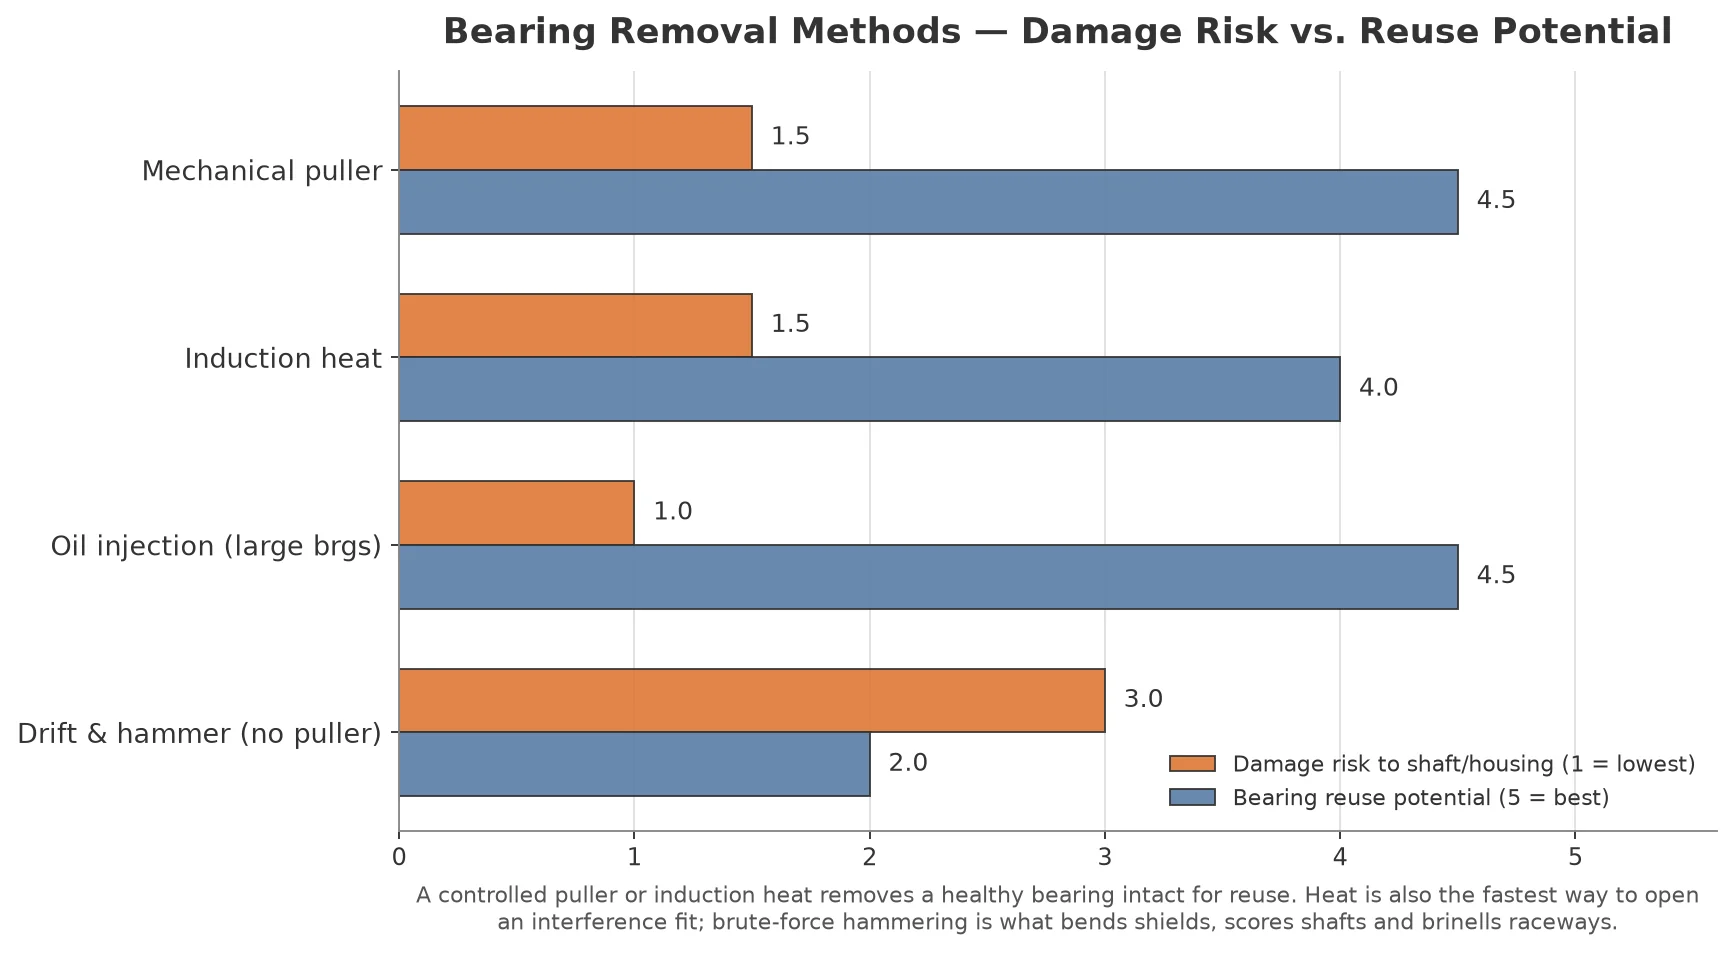
The chart above compares the four main removal approaches on damage risk and reuse potential. The mistakes below are the reasons those scores differ so widely.
Mistake 1: Pulling the Wrong Ring
Hooking the outer ring of a shaft-mounted bearing transmits the pull through the balls and brinells the raceways. The bearing is destroyed even though it may have been perfectly reusable. Always confirm which ring carries the interference fit before the jaws go on — the first rule of how to remove a bearing from a machine.
Mistake 2: Hammering the Bearing Directly
A steel hammer blow on the bearing ring or shield distorts the shield, dents the raceway, and transmits shock through the rolling elements. Shields on bearings like the Talos 6201 ZZ are thin pressed steel — one careless blow can bend a shield into contact with the balls, creating permanent drag and noise. Brass or copper drifts on the ring face only, and never on shields or seals.
Mistake 3: Using Torch Heat on a Reusable Bearing
Oxy-acetylene heat destroys grease, distorts rings, and tempers the steel. If the bearing must survive, use induction heat with a temperature limit of 110 °C. If it must not survive, destructive methods are still less risky to the shaft than uncontrolled torch heating.
Mistake 4: Cocking the Puller
A puller whose jaws grip unevenly applies bending load to the inner ring, which jams the bearing on the shaft and scores the journal. The puller spindle must be centred on the shaft axis, and the jaws must seat fully before force is applied.
Mistake 5: Forcing a Seized Bearing
Brute force on a corrosion-fused bearing either shears the puller jaws or damages the shaft surface. Loosen the interface with penetrating oil and controlled heat first. As noted in our bearing clearance guide, a bearing that has run with insufficient clearance can seize without any warning — which is exactly when a calm, patient removal procedure matters most.
Best Practices by Bearing Type
Different bearing types and sizes call for slightly different removal tactics. The table below summarises the practical recommendations.
| Bearing Type | Typical Fit | Recommended Removal |
|---|---|---|
| Small deep groove ball bearings (6200/6300 series) | k6 shaft / H7 housing | Two-jaw puller on inner ring, or drift-and-hammer; induction heat for stubborn fits |
| Electric motor bearings | k6/m6 shaft | Puller on inner ring, or press the shaft through; induction heater is standard in motor shops |
| Pillow block / mounted units | Adapter sleeve | Release the locking collar and set screw, loosen the adapter sleeve nut — do not pull the housing |
| Cylindrical roller bearings (NU/NJ) | m6/n6 shaft | Oil injection or induction heat; separable design allows the inner ring to be removed independently |
| Spherical roller bearings (large) | p6/n6 shaft | Hydraulic nut or oil injection; induction heater for the inner ring |
| Housing-fitted outer rings / blind holes | P6/N6 housing | Internal puller with slide hammer, or heat the housing bore evenly |
For the small deep groove ball bearings that dominate general machinery, the answer to how to remove a bearing is almost always in the fit, not in the brand. For the small deep groove ball bearings that dominate general machinery — the same ISO-standard range Talos supplies, including the Talos 6201 ZZ bearing — the practical guidance is identical to what you would apply to an SKF, NSK, or FAG equivalent. Bearings manufactured to ISO 492 P0 tolerance are effectively equivalent across brands, so the removal procedure is dictated by the fit and the housing design, not by the manufacturer. When the bearing is damaged but the shaft is reusable, the value protected by careful removal is the shaft — and for a deep groove ball bearing replacement at a fraction of a shaft rework cost, it always pays to remove carefully.
Frequently Asked Questions
What is the safest way to remove a bearing from a shaft?
The safest way is a two-jaw or three-jaw puller gripping the inner ring, with the spindle centred on the shaft axis. If the bearing is accessible from behind, supporting the inner ring and pressing the shaft through is equally safe. For stubborn interference fits, induction heating the inner ring to no more than 110 °C opens the fit with minimal force. At its core, how to remove a bearing safely is a question of applying force in the right place, and the one rule that applies everywhere is: never transmit the pull through the rolling elements.
How do you remove a bearing without damaging the shaft?
Keep the removal force axial, even, and applied to the ring with the interference fit. Pull straight with a centred puller, or tap alternately at 180° positions with a brass drift. Clean and de-burr the shaft shoulder first, lubricate the interface with penetrating oil if the bearing is seized, and heat the inner ring — not the shaft — when an interference fit resists. A shaft journal is easily scored by a cocked puller or a steel hammer, so patience is the real protection.
Can you remove a bearing from a housing without a puller?
Yes. If there is access from behind the housing, push the bearing out with a soft-faced drift against the outer ring. For blind holes, use an internal puller with expanding jaws that grip the outer ring bore, or heat the housing bore evenly with a heat gun so it expands and releases the outer ring. Never heat the bearing itself when it is tight in a housing — the outer ring would expand and grip harder.
How hot can you heat a bearing to remove it?
The temperature limit is the most important number in how to remove a bearing with heat: keep the bearing at or below 110 °C (230 °F) for grease-packed, shielded, or sealed bearings — the grease degrades and seals soften above that. Induction heaters are preferred because they heat the inner ring quickly while the rest of the bearing stays cooler. An oxy-acetylene torch should not be used on a bearing you intend to reuse, because local overheating distorts the ring and tempers the steel.
What do you do when a bearing is stuck or seized on a shaft?
Apply penetrating oil around the inner ring and shaft interface and let it soak, then warm the inner ring with controlled heat and tap gently with a brass drift at alternating positions. Repeat the oil–heat–tap cycle patiently — seized bearings release in stages. If the bearing is scrap and still will not move, cut the inner ring with an angle grinder in two places so it relaxes off the shaft, stopping short of the shaft surface.
Is removing a Talos bearing any different from removing an SKF or NSK bearing?
No. Talos deep groove ball bearings are manufactured to ISO 492 P0 tolerance with standard dimensions, so they are effectively equivalent to SKF, NSK, FAG, and NTN bearings of the same designation — the removal procedure depends on the fit and housing design, not the brand. A Talos 6201 ZZ on a k6 shaft comes off exactly the same way as an SKF 6201-2Z on the same fit.
Conclusion
Whether you reach for a puller, an induction heater, or an oil pump, how to remove a bearing without collateral damage comes down to three rules: identify which ring carries the interference fit, apply the removal force to that ring only, and keep the force axial and even. A mechanical puller on the inner ring handles most shaft-mounted bearings; induction heat opens stubborn fits by working with the physics of expansion; oil injection and hydraulic nuts handle the large roller bearings; and a brass drift, a press, and penetrating oil cover the field situations where no puller exists. Each of these methods protects the two things that matter most — the reusable bearing and, even more importantly, the shaft and housing that the replacement bearing will live in. The full procedures for the fit side of this process are documented in the SKF mounting guidelines, and the fit classes themselves in ISO 492.
Need a reliable replacement after a careful removal? Browse our Deep Groove Ball Bearings collection — including the 6201 ZZ and 6202 ZZ — or contact our engineering team for guidance on fit, clearance, and removal tooling for your application.