Understanding the common bearing failure causes is essential for preventing unexpected downtime in industrial machinery. An unexpected failure can halt a production line, damage adjacent shafts and housings, and turn a routine repair into an emergency call-out. Maintenance engineers, plant managers, and equipment operators all benefit from knowing what actually causes bearings to fail early — and, more usefully, how to stop it happening again. This guide walks through the six common bearing failure causes, failure symptoms, and bearing failure analysis methods that connect a damaged bearing back to its true root cause.
Symptoms of Bearing Failure
Catching these symptoms early is what turns an unplanned breakdown into a scheduled repair. The signs below rarely appear in isolation — a bearing heading toward failure usually shows two or three of them together.
Abnormal Noise and Vibration
A healthy bearing runs quietly, with a smooth and consistent sound. Grinding, rumbling, clicking, or whistling noises signal that damage has already started. Vibration analysis remains the most reliable early-warning tool available: a rise in high-frequency vibration often shows up weeks before a bearing seizes, well before the noise becomes audible to the ear.
Operating Temperature Rise
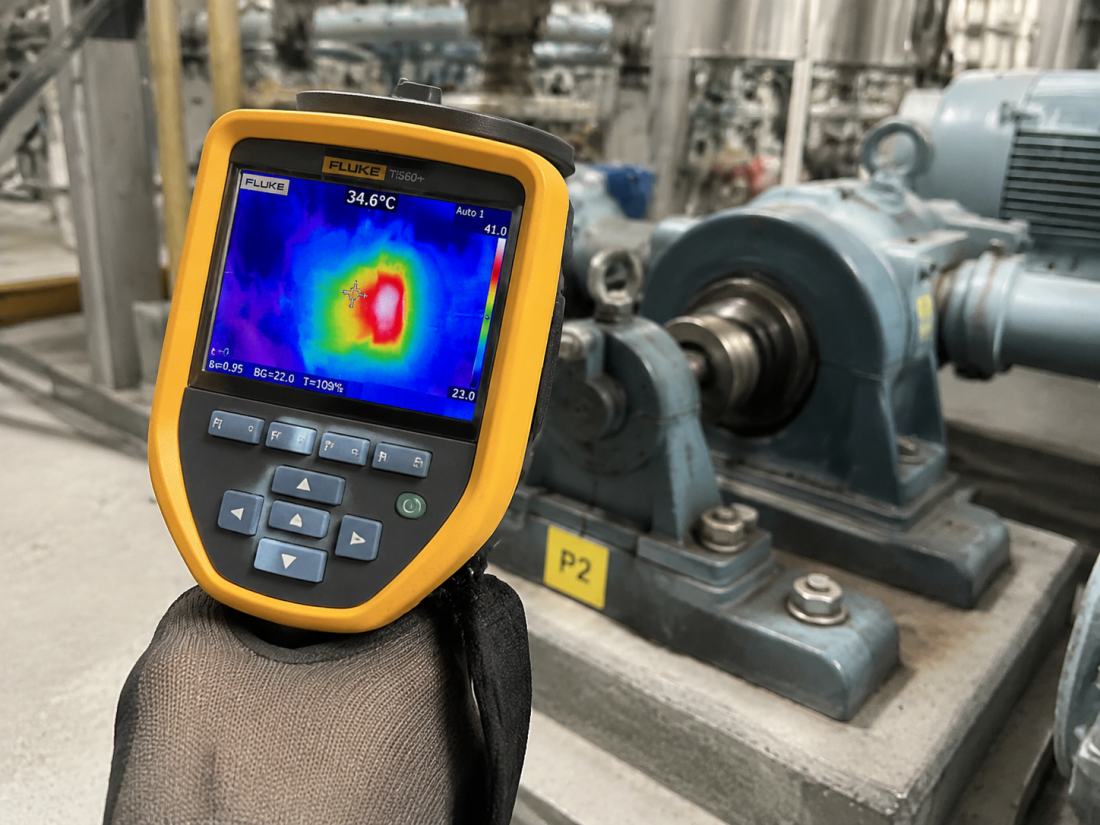
Heat is one of the clearest tells. Every bearing has a normal operating temperature range set by its grease type, speed, and load — and a sustained rise above that baseline, rather than any single fixed number, is what should trigger investigation. As a rough reference point, many grease-lubricated industrial bearings raise concern once housing temperatures climb past roughly 80–90°C, though the real threshold depends on the grease’s dropping point and the bearing manufacturer’s rating, so always check the specific product data sheet rather than relying on a generic figure. Common causes behind a temperature climb include inadequate or excessive lubrication, misalignment, and reduced internal clearance. A thermal imaging camera during routine rounds will usually catch a hot-running bearing before anyone notices it by hand.
Visible Surface Damage
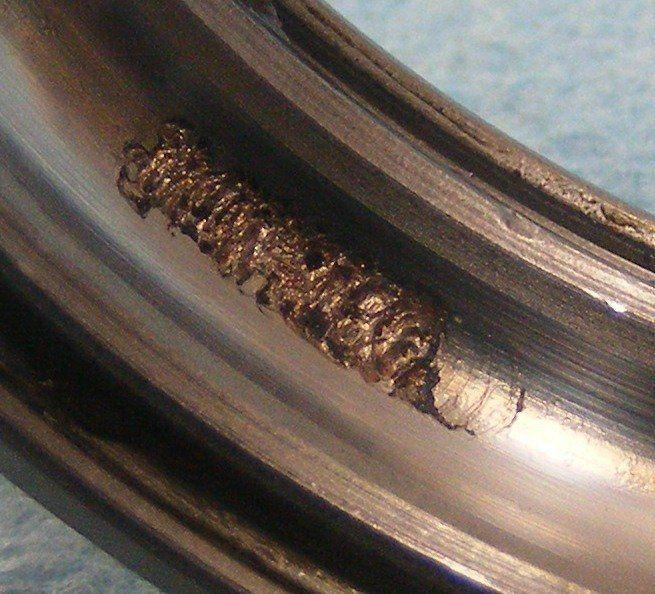
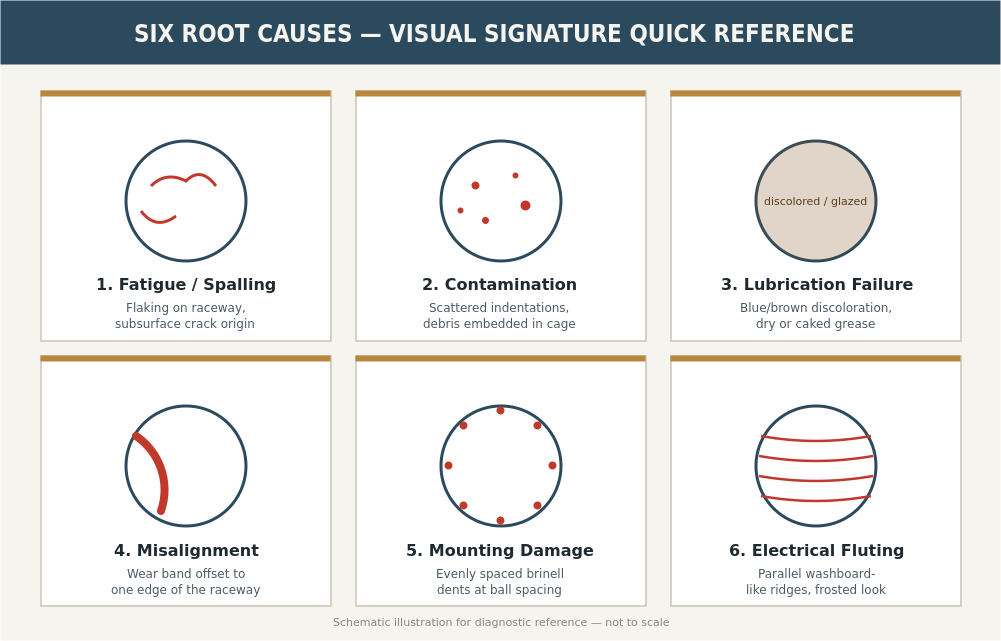
Once a bearing is out of the machine, the raceway tells its own story. Pitting, flaking, or spalling points to fatigue. Blue or brown discoloration means the bearing ran hot. Grooved, wavy patterns across the raceway are the signature of electrical damage. Each pattern below is matched to its root cause in more detail.
Increased Operating Torque
As internal damage builds up, rolling resistance climbs with it. This shows up as a shaft that’s harder to turn by hand, or a motor pulling more current just to hold its speed. By the time torque has risen noticeably, the bearing is usually past the point of monitoring — replacement is the right call.
Common Types of Bearing Failure Modes
Common bearing failure modes include fatigue spalling, lubrication failure, contamination damage, misalignment, mounting damage, and electrical fluting. Understanding these failure types helps engineers identify the root cause instead of only replacing failed bearings.
Six Common Bearing Failure Causes and How to Prevent Them
Bearing failure analysis exists to trace a failure back to its real cause rather than just replacing the part and hoping it doesn’t happen again. SKF bearing failure studies commonly cite lubrication-related issues as a major contributor to premature bearing failures. Lubrication problems, fatigue, mounting and handling errors, and contamination are among the most common factors behind premature bearing failures [1]. It’s worth noting these percentages describe the minority of bearings that fail before their expected service life — SKF’s own data indicates the majority of bearings actually outlast the machines they’re installed in. Still, the practical takeaway holds: most premature failures trace back to something a maintenance program can control.
1. Fatigue / Spalling (Normal End of Life)
Rolling contact fatigue is the baseline failure mechanism every bearing eventually reaches. After enough load cycles, subsurface cracks form beneath the raceway and work their way to the surface, where material flakes away — what’s known as spalling or pitting. When this happens at or near a bearing’s calculated L10 fatigue life, it’s simply the bearing reaching the end of its normal service life. Premature fatigue is a different story, usually driven by excessive load, poor bedding of the housing, or a bearing type that wasn’t matched to the application in the first place. Getting the load rating calculation right — and choosing, say, a roller bearing over a ball bearing for a heavy radial load — extends fatigue life considerably.
2. Contamination / Debris Ingestion
Contamination is both common and largely preventable, which makes it one of the more frustrating causes on this list. Metal chips, sand, dust, and weld spatter find their way in through worn seals, contaminated grease, or a dirty installation environment. Once inside, hard particles indent the raceway and rolling elements, and each indentation becomes a stress concentration point that accelerates fatigue while generating extra noise and vibration. The scale of the damage is easy to underestimate: under the contamination factor (eC) used in the ISO 281 bearing life calculation, heavily contaminated operating conditions can cut calculated bearing life by 50–90% compared to a clean environment [2]. Tight seals and clean handling during installation remain the two most effective defenses.
3. Improper Lubrication
Lubrication problems account for the largest single share of premature bearing failures — around 36% by SKF’s estimate [1] — and the category covers more ground than most people expect. Under-lubrication allows metal-to-metal contact and rapid heat buildup. Over-lubrication causes churning and its own heat problems, particularly at higher speeds. Using the wrong lubricant type or viscosity grade causes similar damage through a different path. Getting this right means selecting the correct grease or oil for the application, sticking to a relubrication schedule, and following the manufacturer’s viscosity recommendations rather than guessing.
4. Misalignment
Misalignment happens when the inner and outer rings aren’t concentric, or when the shaft and housing axes aren’t parallel. Either way, the load stops distributing evenly across the rolling elements and instead concentrates on one edge of the raceway. The telltale signs are asymmetric wear patterns, elevated running temperature, and a distinct vibration signature at 1x and 2x rotational frequency. Shaft deflection under load, housing machining tolerances, and thermal expansion during operation are the usual culprits. Self-aligning ball bearings can absorb minor angular misalignment, but anything beyond minor needs to be corrected at the shaft or housing level — the bearing can’t fix a structural problem on its own.
5. Improper Mounting / Installation
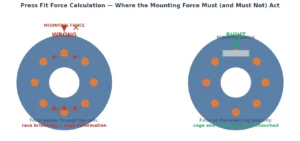
A well-made bearing installed badly will still fail early. The most common mistakes: driving mounting force through the rolling elements instead of the ring being fitted, using an interference fit tight enough to squeeze out internal clearance, misaligning the bearing during assembly, and reaching for the wrong tool under time pressure. Induction heaters, hydraulic mounting tools, and a torque wrench used correctly solve most of this. It’s a skill, not just a step — and it’s one that pays for itself the first time it prevents a callback.
6. Electrical Arcing / Fluting
In electric motors and generators, stray current passing through the bearing arcs between the rolling elements and raceways, leaving behind a washboard-like fluting pattern that eventually turns into noise, vibration, and failure. Variable frequency drives (VFDs) are a frequent source of this current, driven by high-frequency common-mode voltage. Insulated bearings, shaft grounding brushes, conductive grease, and proper motor grounding all address the problem — but note that once fluting has appeared, the damage is done; mitigation prevents the next bearing from suffering the same fate.
Diagnostic Steps — How to Identify Each Failure Mode
A proper bearing failure analysis starts with operating data and ends with a hands-on visual inspection. The sequence below moves from broad to specific.
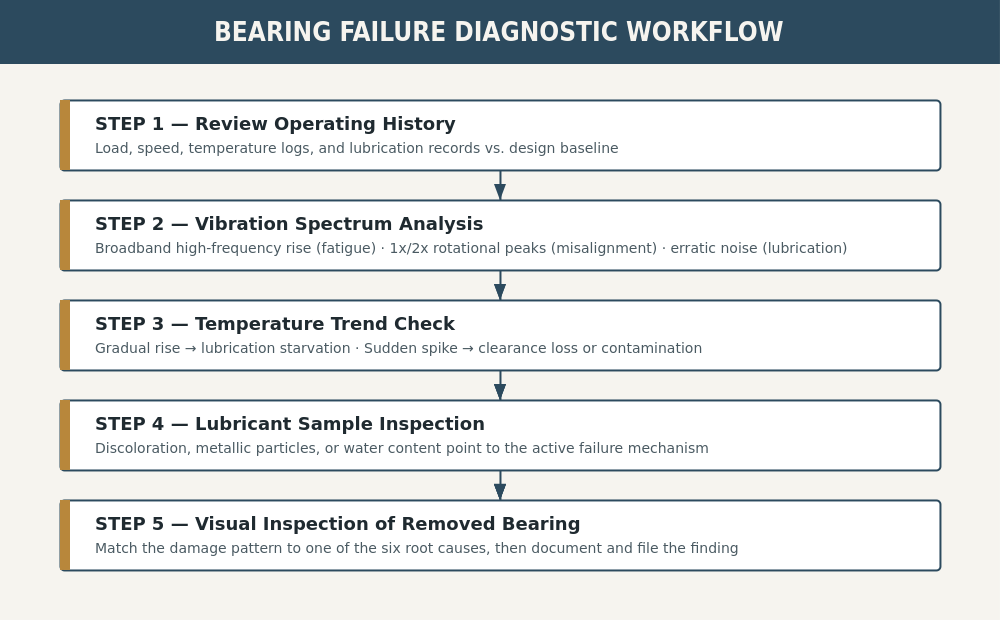
- Review operating history. Check load conditions, operating speeds, temperature records, and lubrication history against normal parameters.
- Analyze vibration data. Spectral analysis separates fatigue (broadband high-frequency rise), misalignment (1x and 2x rotational frequency peaks), and lubrication problems (erratic high-frequency noise) from one another.
- Check operating temperature. A gradual rise usually points to lubrication starvation; a sudden spike suggests clearance loss or a contamination event.
- Examine lubricant condition. A grease or oil sample showing discoloration, metallic particles, or water contamination hands you a direct clue to the mechanism at work.
- Inspect the bearing visually. Clean it and examine it under good light, then match the damage pattern to its root cause:
| Pattern observed | Likely root cause |
|---|---|
| Flaking on raceways and rolling elements | Fatigue / spalling |
| Surface indentations, denting, debris in retainer | Contamination |
| Blue/brown discoloration, glazing, dry or caked grease | Lubrication failure |
| Asymmetric wear, load zone offset from raceway center | Misalignment |
| False brinelling marks at ball spacing, cracked rings | Mounting damage |
| Fluting, frosted appearance, washboard pattern | Electrical damage |
Document the findings. Photograph the damage, measure clearance and dimensions, and log everything in your maintenance management system — the next failure investigation will thank you for it.
SKF’s bearing failure and prevention guide remains one of the more thorough visual catalogs of damage classifications available for cross-checking a diagnosis [1]. The ISO 15243 standard also defines the internationally recognized terminology for bearing damage modes, for teams that need a formal reference [3].
Prevention and Best Practices
Proper Lubrication Management
- Match lubricant type and viscosity grade to the actual operating speed, temperature, and load — not the nearest tub on the shelf.
- Set a relubrication schedule from manufacturer recommendations or a calculated interval, and stick to it.
- Avoid over-greasing. SKF’s general guidance is to fill roughly 20–30% of free space for high-speed applications, 30–50% for standard horizontal-shaft duty, and up to 70–100% for low-speed or vertical-shaft applications needing extra contamination protection [4]. Exact figures vary by bearing type, so check the manufacturer’s fill chart for anything unusual.
- Use automated lubrication systems where the application justifies the cost — consistency matters more than any single top-up.
Effective Sealing and Contamination Control
- Match the seal to the environment: contact seals for dirty conditions, non-contact seals for clean, high-speed applications.
- Inspect and replace seals at every maintenance interval, not just when they visibly fail.
- Keep bearings in their original packaging until the moment of installation.
- Keep the installation area clean — a five-minute wipe-down prevents a six-month failure investigation.
Correct Mounting and Alignment
- Use proper mounting tools — induction heaters, hydraulic nut systems, mechanical pullers — and never hammer a bearing directly onto a shaft.
- Apply mounting force to the ring being fitted: inner ring for shaft mounting, outer ring for housing mounting.
- Verify shaft and housing fits against the bearing manufacturer’s tolerance recommendations before assembly, not after.
- Check shaft alignment with laser tools during installation and again after any maintenance work.
Condition Monitoring
- Run regular vibration monitoring with alarm thresholds set for the specific machine, not generic defaults.
- Use thermography during routine rounds to catch hot-running bearings early.
- Run periodic oil analysis on oil-lubricated systems.
- Track operating hours against calculated L10 life so replacement is planned, not reactive.
Proper Application and Selection
- Confirm the selected bearing type and size actually suit the application’s load, speed, and environment.
- Still deciding between a bearing and a bushing? Read our bearing vs bushing comparison guide to make the right call.
- Factor failure history into the replacement bearing choice — move to a sealed or shielded version if contamination was the root cause last time.
- For VFD-driven motors, decide upfront whether insulated bearings or shaft grounding brushes are needed to prevent electrical damage.
When to Replace vs. Repair
Not every worn bearing needs immediate replacement — but repairing a damaged one is rarely the right call for standard industrial bearings. The table below is a starting point for that decision.
| Condition | Action | Reasoning |
|---|---|---|
| Minor surface discoloration, no measurable damage | Monitor and re-lubricate | Mild heat staining may not affect function yet. Increase monitoring frequency. |
| Audible noise, elevated vibration | Plan replacement at next scheduled downtime | Internal damage has begun; run-to-failure risk is high. |
| Visible spalling, flaking, or pitting on raceways | Replace immediately | Damage accelerates quickly, and debris will contaminate adjacent components. |
| Cracked rings or cage damage | Replace immediately | Catastrophic failure is imminent; inspect the mating shaft and housing for secondary damage. |
| Electrical fluting without advanced spalling | Replace bearing and install mitigation | A replacement bearing will fail the same way without addressing the current path. |
| Bearing has exceeded L10 life with no symptoms | Replace proactively during planned outage | Statistical failure probability rises quickly beyond this point. |
Regrinding raceways or replacing rolling elements is possible, but for standard industrial bearings it rarely makes economic sense — professional remanufacturing tends to cost close to a new bearing while delivering a shorter remaining service life. Replacement is almost always the better call, on cost and on reliability.
Frequently Asked Questions
What are the most common bearing failure causes?
Improper lubrication, by most industry estimates — SKF puts it at roughly 36% of premature failures [1]. That figure covers under-lubrication, over-lubrication, and simply using the wrong lubricant, so “proper lubrication” fixing over a third of premature failures isn’t an exaggeration.
How can you tell if a bearing is failing?
Watch for unusual noise, rising vibration, climbing operating temperature, higher motor current draw, and — once the bearing is out — visible pitting, spalling, or discoloration.
Can a failing bearing cause other damage to machinery?
Yes. Heat and debris from a failing bearing can damage the shaft surface, housing bore, and nearby components. In severe cases, a seized bearing can twist a shaft, bring the rotor into contact with the stator in an electric motor, or damage a gear train. That knock-on risk is a big part of why catching bearing failure early matters beyond just the bearing itself.
How long should a bearing last before failure?
It depends on load, speed, lubrication, environment, and maintenance quality — there’s no single number. Manufacturers calculate an L10 life: the number of operating hours 90% of a given bearing population will complete before fatigue failure sets in. In clean, well-lubricated, properly loaded conditions, that can mean tens of thousands of hours. Poor maintenance can cut it down to months, or even weeks.
What is the difference between spalling and fluting in bearing failure?
Spalling is flaking or pitting from rolling contact fatigue — the normal end-of-life mechanism. Fluting is a specific pattern caused by electrical arcing, showing up as parallel washboard-like ridges. Both are bearing failure modes, but the fix for one won’t touch the other: spalling calls for load or bearing-selection changes, fluting calls for electrical mitigation.
Should I replace a bearing immediately if I detect vibration changes?
Not automatically — it depends on severity. A small rise in vibration amplitude can often run to the next planned downtime with closer monitoring. If vibration crosses an alarm threshold, comes with a temperature rise, or is accelerating quickly, replace it now rather than waiting.
How does contamination cause bearing failure?
Hard particles passing through the load zone leave indentations on the raceway and rolling elements. Each indentation becomes a stress concentration point that speeds up fatigue crack formation. As noted above, even modest contamination levels can cut calculated bearing life by 50–90% under the ISO 281 contamination factor [2] — which is why it ranks among the more damaging causes on this list despite being one of the more preventable ones.
What are the signs of premature bearing failure?
Premature bearing failure usually shows several warning signs before complete failure occurs. Common indicators include abnormal noise, increased vibration, rising operating temperature, lubricant discoloration, higher operating torque, and visible damage such as pitting, flaking, or spalling on the raceway. Identifying these symptoms early allows maintenance teams to perform bearing failure analysis, correct the root cause, and prevent repeated failures.
How do you perform bearing failure analysis?
Bearing failure analysis involves identifying the damage pattern and tracing it back to the actual operating cause. The process typically includes reviewing operating conditions, checking load and lubrication history, analyzing vibration and temperature data, inspecting lubricant condition, and examining the damaged bearing surface. By matching damage characteristics such as spalling, corrosion, fluting, or uneven wear with their likely causes, engineers can determine the correct corrective action and prevent future bearing failures.
Conclusion
Understanding these bearing failure causes helps maintenance teams reduce downtime and extend bearing service life. The six causes covered here — fatigue, contamination, improper lubrication, misalignment, improper mounting, and electrical arcing — cover the vast majority of bearing failures maintenance teams will ever investigate.
Vibration monitoring, thermography, and routine inspection catch most failures early; correct lubrication, sealing, mounting, and bearing selection prevent most bearing problems from happening in the first place.
The real point of a bearing failure analysis isn’t assigning blame — it’s closing the loop so the same failure doesn’t repeat on the next bearing. Training, condition monitoring equipment, and buying the right bearing for the job all pay for themselves many times over in reduced downtime.
Need help identifying the cause of a bearing failure? Share your application details, operating conditions, or failed bearing photos with our engineering team. We can help analyze the failure and recommend a suitable replacement bearing solution.
Sources
[1] SKF, Bearing damage and failure — causes and prevention (bearing failure training materials), skf.com.
[2] ISO 281:2007, Rolling bearings — Dynamic load ratings and rating life (contamination factor eC).
[3] ISO 15243, Rolling bearings — Damage and failure — Terms, characteristics and causes.
[4] SKF, Determining grease quantities for initial fill and relubrication, skf.com.